The made-to-measure wardrobe
A full-height wardrobe sized to your wall, cut from board by a workshop and put together at home. Here is how one is built, the dimensions that decide whether it works, what goes on the cutting list, and what it costs once you stop paying for the drawing.
Why a wardrobe is worth making to measure
A flatpack wardrobe comes in a handful of widths and one or two heights, and your room comes in none of them. Put a 1500mm unit in a 1780mm alcove and you get a 280mm gap that collects dust, plus a strip above it that does the same. Bought furniture also tends to be shallow, because a shallow box is cheaper to ship, and a hanger that does not fit front to back hangs at an angle and stops the doors closing.
A wardrobe is also one of the simplest things you can have made. It is a tall box with dividers, a few shelves and some doors, and every panel is a plain rectangle. Any cut-to-size workshop with a panel saw and an edge bander can make one, and that is what this guide plans for.
How a board wardrobe is built
Board wardrobes are usually built frameless, the European way: there is no face frame, just a carcass of board with doors hung straight onto its front. The only thing you have to choose is how the corners go together, and that choice changes every panel size on the list, so make it once and keep it. The convention here is the common one: the sides run the full height and the top and bottom sit between them.
- Two sides, the full carcass height by the full depth, with the grain running up them.
- Top and bottom, fitted between the sides, so they are the overall width less two board thicknesses.
- Dividers standing on the bottom and under the top, splitting the interior into bays.
- A back, captured in a groove routed into the sides, top and bottom 16mm in from the rear edge and 9mm deep. The back is what stops a tall box racking into a parallelogram, so it is not optional.
- A plinth, a box of four rails the carcass stands on, set back from the front to leave a toe kick.
On most budget furniture the back is 3mm hardboard pinned on. Here it is the same 18mm board as the carcass. The machines that cut and edge melamine board take 17–26mm stock, so a thin back would mean a second order from somewhere else. A full-thickness back sitting in a groove also makes a much stiffer carcass, and you can screw a rail bracket or a wall fixing into it.
The dimensions that matter
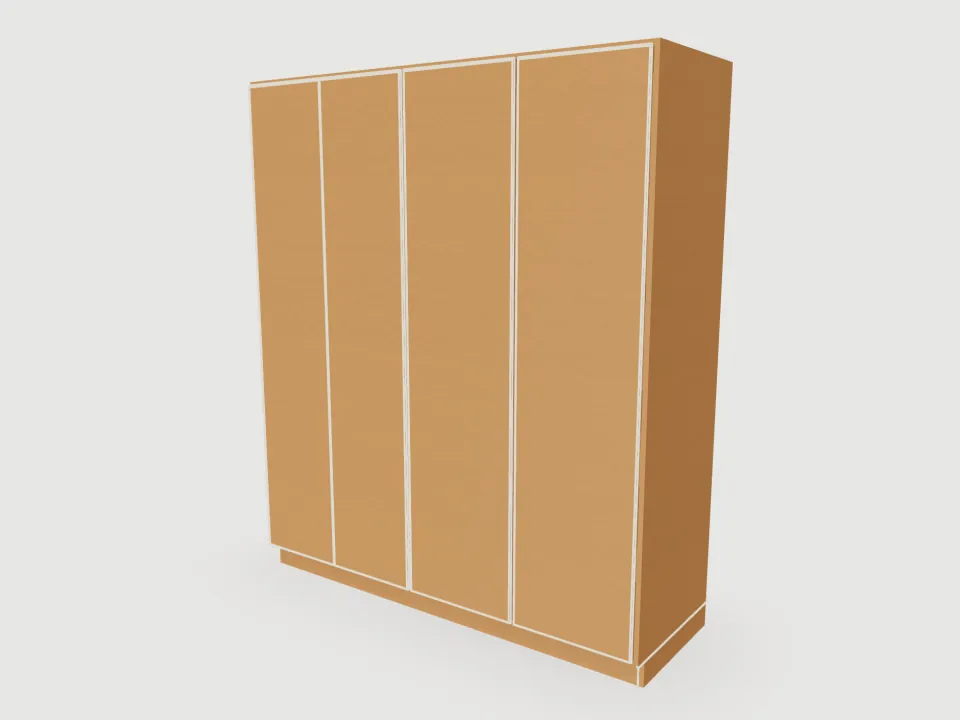
The worked example is a four-door wardrobe 1800mm wide, 2100mm tall and 600mm deep, with an 800mm hanging bay and two shelved bays of 464mm. The rules behind those numbers are what you would change to fit your own wall.
- Depth, 600mm. This is the most important number, and also the maximum the designer allows. The grooved back takes 34mm off it, leaving 566mm in front of the back for hangers and the doors. Shelves are 564mm deep. Go much shallower and a coat hanger will not fit square to the doors.
- Bay width, 900mm at most. An 18mm chipboard shelf visibly sags past about 800mm under load, and 900mm is the practical limit without a support in the middle. The designer treats it as a hard limit and warns from 800mm. If you widen the wardrobe far enough, it adds another bay rather than let the shelves sag. The example's hanging bay is 800mm, right at that line.
- Hat shelf at 1760mm. The hanging bay has one fixed-position shelf whose underside sits 1760mm off the floor. Hang the rail just under it and you have about 1.6m clear below, which is enough for full-length coats and dresses. If you want shirts on two levels instead, add a second shelf halfway down and hang a second rail under it.
- Plinth, 100mm, recessed 50mm. The plinth lifts the bottom clear of a skirting board and a hoover, and setting it back means your toes do not hit it when you stand at the doors. A plinth can be anything from 70mm to 150mm. Anything lower than 70mm cannot be made, so it is either 70mm or more or left off.
- Height, to suit the ceiling. The carcass is built lying on its back and then stood up. When it tips, it sweeps its diagonal: a 2000mm carcass that is 600mm deep needs 2088mm. Before you take the height right up to the ceiling, check that the diagonal of the carcass, without the plinth, still clears it.
There is also a limit on width, and it comes from the board. The back is one piece, and on a 2800×2070 sheet a one-piece back runs out of room a little past two metres of wardrobe width. Wider than that, the configurator flags the back as too big for a sheet. For a long wall, build two carcasses and stand them side by side. They are easier to carry upstairs, too.
Doors: why four, not two
A 1.8m wardrobe could have two 900mm doors, and it would be a mistake. A door almost two metres tall is a heavy panel hanging off one edge, and once it is wider than about 600mm it starts to drop at the far corner and swings out across the room. The example uses four leaves instead. A pair of 397mm doors covers the hanging bay and a 461mm door covers each shelved bay, with a 3mm gap around and between them all.
The doors are overlay doors on concealed hinges, so the workshop bores the hinge cups in the door: 35mm across, 12mm deep, centred 22mm in from the hinge edge on the inside face. How many depends on the door height: two up to 900mm, three to 1500mm, four to 2000mm and five above that. The first and last cup sit 100mm from the ends. The example's doors are 1961mm tall, so each takes four hinges, which makes sixteen for the wardrobe. A 5mm handle hole is bored halfway up, 40mm in from the opening edge.
Inside: shelves on the 32mm system
The shelves rest on pins, not fixings, so you can move them. The pin holes follow the 32mm system that cabinetmakers have standardised on. There are two columns on every side and divider, 37mm in from the front and back edges, with holes 5mm across, 13mm deep and 32mm apart. Each shelf is placed on that grid, so its pins always land on a hole.
Drilling a full-height panel from top to bottom is roughly a hundred holes a side, most of them at heights nobody will ever move a shelf to, and drilling is charged per hole. Instead, each shelf gets a band three holes above and three below it, which gives you 96mm of adjustment either way. Shelves are cut 2mm narrower than their bay so they slide in.
Board, and how many sheets
The usual wardrobe board is 18mm melamine-faced chipboard. The face is already finished, it does not move with the seasons, and on a panel this size it is far cheaper than anything else. The decors in the designer are real catalogue codes a workshop will recognise: a plain Premium White (W1000 ST40), Onyx Grey (U961 ST2), and woodgrains including Shorewood (H3090 ST22) and Natural Halifax Oak (H1180 ST37). They come in 2800×2070mm sheets. Birch plywood and MDF come in 2440×1220mm.
Sheet size matters more than it seems. The parts are laid out on sheets with straight cuts from edge to edge, the way a panel saw works, with 30mm between parts and a 20mm trim at every edge. A woodgrain part has to keep its length along the sheet's length, so the grain runs up the doors; a plain one can turn sideways to fit. The example comes to four sheets of 2800×2070. In MDF it takes seven of the smaller sheets for exactly the same parts.
Every visible front edge gets 2mm ABS edge banding: the fronts of the sides, top, bottom, dividers and shelves, and one long edge of the plinth front. Doors are banded on all four edges. Edges you never see, and the back, which is hidden in its groove, are left raw. On the example that adds up to 27.8 metres of banding.
The wardrobe cutting list
The whole example comes to 24 parts:
- Sides, 2 at 2000×600, front edge banded, grooved for the back and drilled for shelf pins.
- Top and bottom, 2 at 1764×600, front edge banded and grooved.
- Dividers, 2 at 1964×566, front edge banded and drilled. They stop against the back rather than going into its groove.
- Back, 1 at 1982×1782, raw, in one piece.
- Doors, 2 at 1961×397 and 2 at 1961×461, banded all round and bored for hinge cups and a handle.
- Shelves, 1 hat shelf at 798×564 and 8 at 462×564, front edge banded.
- Plinth, 2 rails at 1764×100 and 2 at 550×100.
The spreadsheet is in the format a cut-to-size workshop imports, one row per part: decor code, thickness, length, width, quantity, description, the four edges (L1, L2, W1, W2), edge finish and a note. That template has no column for machining, so the back grooves and the couple of hundred drilled holes are not on it. The designer warns you about this next to the export, so you do not find out when the parts turn up undrilled.
The machining goes in the DXF instead, which is the same sheet layout drawn for a CNC: outlines on a cut layer, the grooves on their own layer, every bore on a drilling layer. Send both and the workshop has everything. The cut plan on screen is drawn from the same layout, so what you see is what they get.
What it costs
Having fitted wardrobes made usually starts with a home visit, then a design, then a quote, and then a wait. Most of what you pay for is somebody measuring your room and drawing it, not the board. The board and the cutting cost much the same wherever you buy them.
At the cut-to-size rates the designer quotes from, the example in Shorewood breaks down like this:
- Board, £361.60: four whole sheets at £90.40. You pay for whole sheets, not square metres, so the offcuts are yours.
- Cutting, £144.64: the 40% the service adds on top of the board to cut it to size.
- Edge banding, £51.48: 27.8m at £1.85 a metre.
- Machining, £38.55: the back grooves by the metre, the pin holes and hinge cups by the hole.
- Fixings, £18.60: cam-and-dowel sets for the carcass joints.
That is £614.87 before VAT, or £737.84 with it. In Premium White it comes to £657.87 with VAT, because the white board costs less per sheet. Change a dimension and the price updates straight away, because the 3D view, the cutting list and the quote all come from the same set of panels.
What is not in the price
The quote covers the panels and the carcass fixings. Everything that moves, or that you hang things from, you buy yourself, and it is better to know that now than when the boxes arrive:
- The hanging rail. The model does not include one, which is why the hanging bay has a hat shelf with the clear drop beneath it. You buy a rail cut to the bay's 800mm and two end brackets, and screw them to the side and the divider just under the shelf.
- Hinges. The cups are bored for you, but the hinges themselves are not supplied: sixteen 35mm concealed overlay hinges for the example.
- Handles, or knobs, for the 5mm holes.
- Shelf pins: four per shelf, 5mm, so 36 for the example.
- A wall fixing. A two-metre wardrobe should always be fixed to the wall so it cannot tip. Use a bracket through the back near the top, into the wall behind.
Assembly
- 1. Build the plinth where the wardrobe will stand and level it. Pack under it where the floor dips; once the carcass is on top you will not get it level again.
- 2. On the floor in front of it, lay one side down, inside face up, and fix the top and bottom to it.
- 3. Slide the back into its grooves, then fix the second side. Now that the back is in, the carcass is square. If it will not go in, the carcass is out of square, not the back.
- 4. Fit the dividers against the back, between the top and bottom.
- 5. With a helper, stand the carcass up, lift it onto the plinth and fix it to the wall.
- 6. Fit the rail, put the pins and shelves in, then hang the doors last. Adjust the hinges until the 3mm gaps run straight.
Walls and floors are rarely true, so do not size the wardrobe to touch both walls of an alcove. Leave a little clearance each side and cover it with a strip of the same board, cut to follow the wall.
- Board
- MFC 18mm
- Construction
- Frameless
- Back
- 18mm, grooved
- Units
- Millimetres